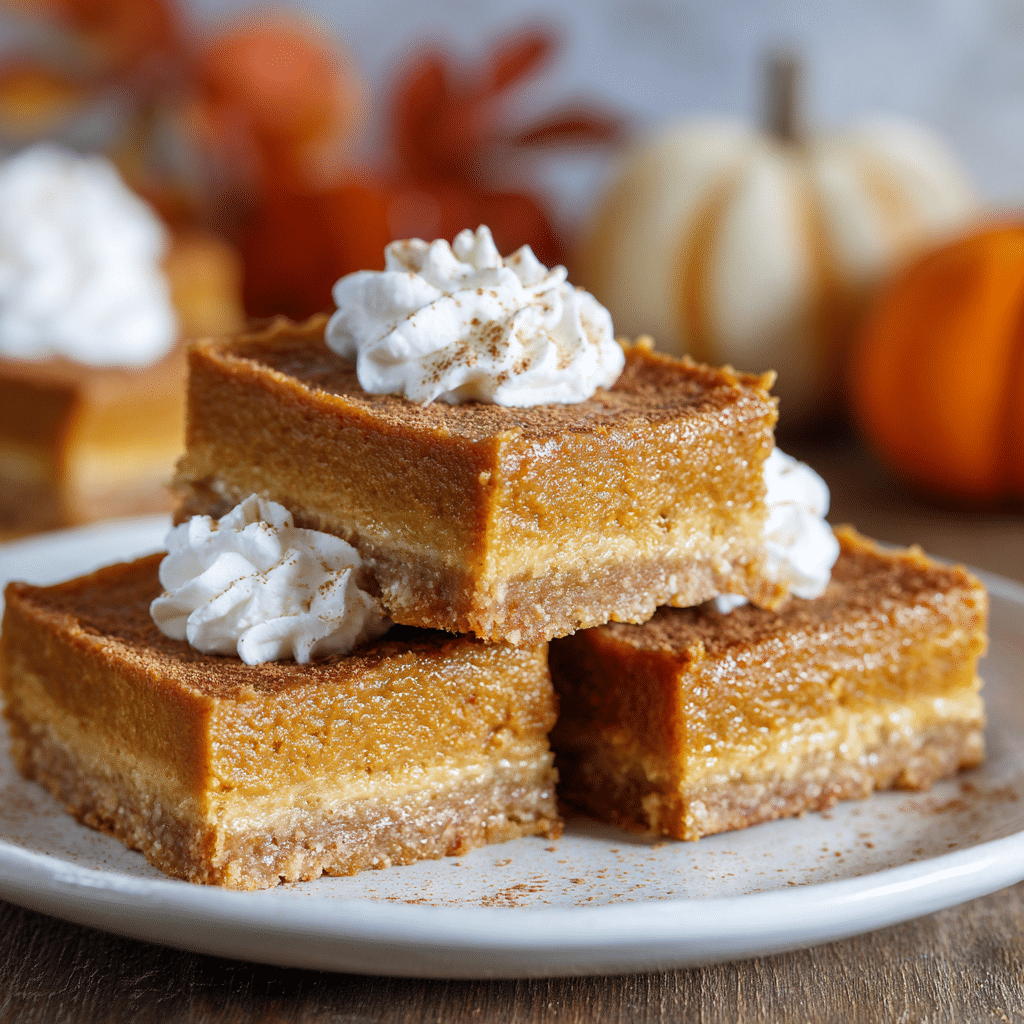
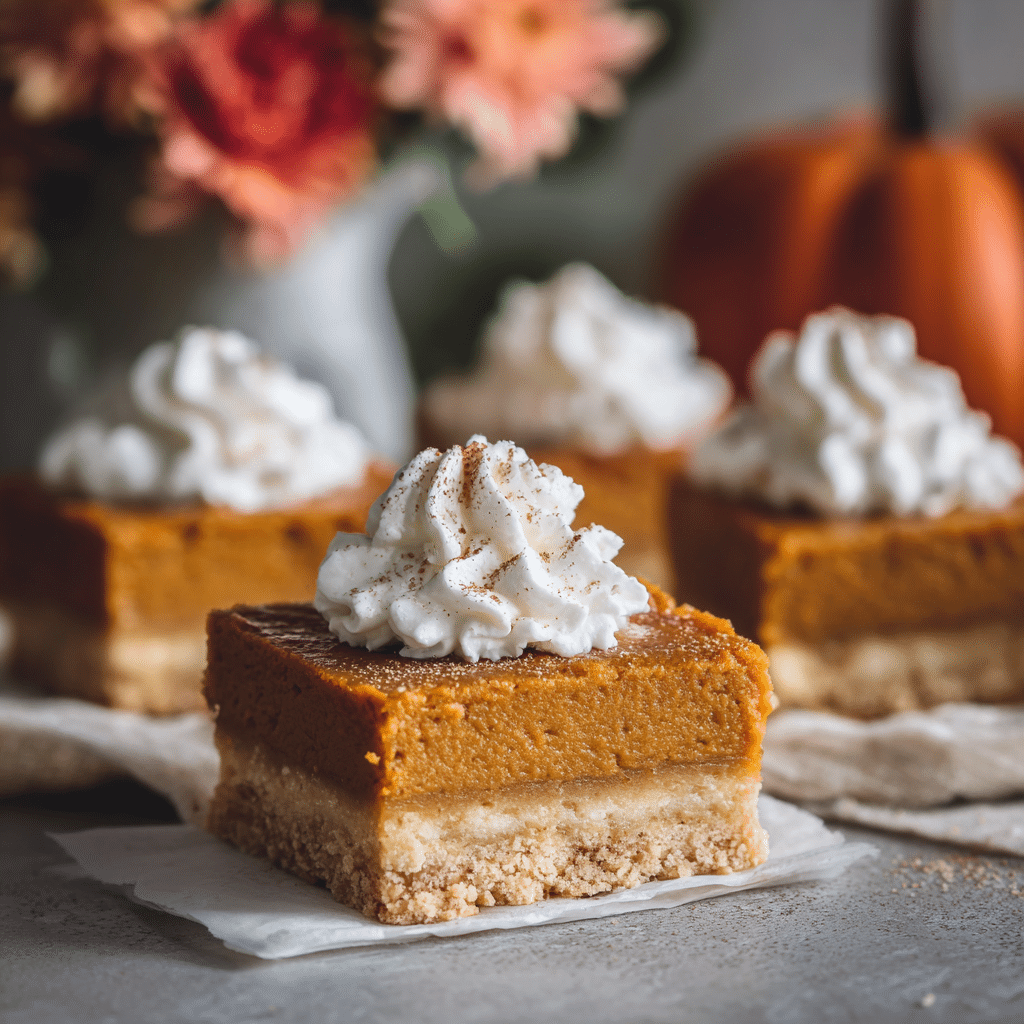
Pumpkin Pie Bars Recipe
Nothing says cozy fall dessert like Pumpkin Pie Bars, and these bars capture all the rich, spicy flavor of traditional pumpkin pie with a delightfully buttery graham cracker crust. They are not only irresistibly tasty but also incredibly convenient, making them a perfect make-ahead treat for holiday gatherings or any time you crave a little autumn comfort in dessert form. With their velvety pumpkin filling and crisp crust, these Pumpkin Pie Bars will quickly become one of your favorite go-to sweets to share with friends and family.
Ingredients You’ll Need
This recipe calls for simple yet essential ingredients that come together beautifully to create the perfect balance of texture and flavor in your Pumpkin Pie Bars. Each ingredient plays a vital role, from the crunchy graham cracker crust to the luscious, spiced pumpkin filling.
- Graham cracker crumbs: Provide a buttery, crunchy base that complements the smooth pumpkin filling.
- Unsalted butter: Melted to bind the crust and add rich flavor without overpowering the spices.
- Granulated sugar: Sweetens both crust and filling to just the right level.
- Salt: Enhances all the flavors and balances the sweetness.
- Large eggs: Give the filling structure and a creamy texture.
- Vanilla extract: Adds depth and warmth to the pumpkin spices.
- Ground cinnamon, ginger, nutmeg, and cloves: Classic pumpkin pie spices that bring that comforting fall aroma and flavor.
- Pumpkin puree: The star ingredient that delivers creamy texture and vibrant orange color.
- Heavy cream: Makes the filling ultra-smooth and luscious.
- Whipped cream (optional): A light, airy topping that pairs perfectly with each bar.
How to Make Pumpkin Pie Bars
Step 1: Prepare the Graham Cracker Crust
Start by preheating your oven to 325 degrees. Spray a 9-inch square pan with cooking spray and line it with foil for easy removal later. Mix graham cracker crumbs, melted butter, sugar, and salt until all crumbs are moist and press this mixture firmly into the pan’s bottom. Bake for 5 minutes to set the crust while you prepare the filling. This quick step helps create a buttery, crisp crust that holds the filling beautifully.
Step 2: Make the Pumpkin Pie Filling
Increase the oven temperature to 375 degrees. In a large bowl, beat the eggs and sugar together until the mixture becomes thick and pale—this will help give the filling a light, creamy texture. Add in vanilla, spices, and salt, then mix until fragrant. Stir in the pumpkin puree and heavy cream until everything is well combined. Pour this luscious filling over the baked crust and bake for 32 to 40 minutes, until the center is just set and no longer jiggly. This careful baking ensures your bars are perfectly creamy without being runny.
Step 3: Chill and Slice
Once out of the oven, cool the bars on a wire rack to room temperature, then chill them in the refrigerator for at least 6 hours or overnight. This chilling step is essential—it helps the filling to firm up so clean, neat slices are possible. When ready, use the foil edges to lift the entire slab from the pan, run a knife around the edges, cut into squares, and you’re ready to serve.
How to Serve Pumpkin Pie Bars
Garnishes
A dollop of freshly whipped cream adds a deliciously light contrast to the rich, spicy filling, making every bite heavenly. You can also sprinkle a pinch of cinnamon or nutmeg on top for a charming finishing touch.
Side Dishes
These Pumpkin Pie Bars pair wonderfully with a hot cup of coffee, spiced tea, or a glass of cold milk. For a heartier spread, serve alongside roasted nuts or caramel-drizzled apples to keep the autumn vibes going strong.
Creative Ways to Present
Try serving your Pumpkin Pie Bars on a rustic wooden board with a scattering of toasted pecans and mini marshmallows for festive appeal. Another fun idea is to layer them in parfait glasses with whipped cream and cinnamon for an elegant twist that’s sure to impress your guests.
Make Ahead and Storage
Storing Leftovers
Pumpkin Pie Bars keep beautifully in the fridge when covered tightly with plastic wrap or stored in an airtight container. They will stay fresh for 3 to 4 days, allowing you to enjoy them whenever a pumpkin craving strikes.
Freezing
You can freeze these bars by wrapping them tightly in plastic wrap and then placing them in a freezer-safe container or bag. They’ll keep for up to 2 months frozen, making them an excellent option to prepare well ahead of any occasion.
Reheating
When you want to enjoy the bars warm, simply thaw them in the refrigerator overnight, then reheat gently in a low oven or microwave for a few seconds. This brings back that freshly baked feeling without compromising texture or flavor.
FAQs
Can I use canned pumpkin pie filling instead of pumpkin puree?
It’s best to use pumpkin puree rather than canned pumpkin pie filling because the filling already contains spices and sweeteners, which can throw off the flavor and texture balance of the bars.
What pan size should I use for these Pumpkin Pie Bars?
A 9-inch square baking pan is perfect for this recipe as it yields nicely sized bars and ensures even baking.
Can I make these bars vegan or dairy-free?
To make these bars vegan, you’d need to substitute the butter with a plant-based alternative, use a vegan graham cracker crust, and swap heavy cream and eggs with suitable dairy-free and egg-free replacements. Keep in mind this will alter the texture somewhat.
How do I know when the bars are done baking?
The bars are done when the center is no longer jiggly and the filling looks set. They might still have a slight wobble, but it should not be watery or excessively loose.
Can I double the recipe?
Absolutely! Just double the ingredients and bake in a larger pan or two 9-inch pans, adjusting cooking time slightly to accommodate the increased volume.
Final Thoughts
If you’re on the hunt for a dessert that’s both comforting and easy to make, you absolutely have to try these Pumpkin Pie Bars. They bring all the cozy flavors of fall right to your kitchen with minimal fuss and maximum taste. Perfect for holidays or any special occasion, they’re sure to become a beloved treat you’ll want to make again and again.