Chocolate Taco Dessert 🌮 Recipe
If you have a sweet tooth craving that’s a little bit fun and totally irresistible, let me introduce you to the delightful world of the Chocolate Taco Dessert 🌮. This treat combines the crispy, chocolaty goodness of a shell shaped like a taco with your favorite ice cream and an array of toppings that bring texture, flavor, and a touch of whimsy. It’s a playful twist on dessert that’s perfect for impressing guests or indulging yourself on a cozy night in. Each bite offers that perfect balance of crunchy chocolate and creamy filling, making it a dreamy dessert you’ll want to make again and again.
Ingredients You’ll Need
Gathering the right ingredients for this dessert is surprisingly simple but crucial—the quality and freshness of each component truly elevate the final flavor and texture. From the luscious chocolate that coats the shell to the creamy ice cream and the toppings you choose, every element plays a role in your perfect Chocolate Taco Dessert 🌮.
- Flour tortillas: Choose small, soft tortillas that can be easily shaped once coated with chocolate for that signature taco shell form.
- Good-quality dark or milk chocolate: Melt it carefully for a glossy coating that’s rich and smooth.
- Ice cream: Pick your favorite flavors—vanilla, chocolate, or something fruity—to fill the taco with creamy goodness.
- Chopped nuts or sprinkles: These add crunch and color to your dessert tacos for an extra textural dimension.
- Fresh berries or chopped fruit: A bright, juicy addition that balances sweetness with freshness.
- Whipped cream or drizzle sauces: For that final, indulgent touch that makes each bite luscious and satisfying.
How to Make Chocolate Taco Dessert 🌮
Step 1: Prepare the Chocolate Shells
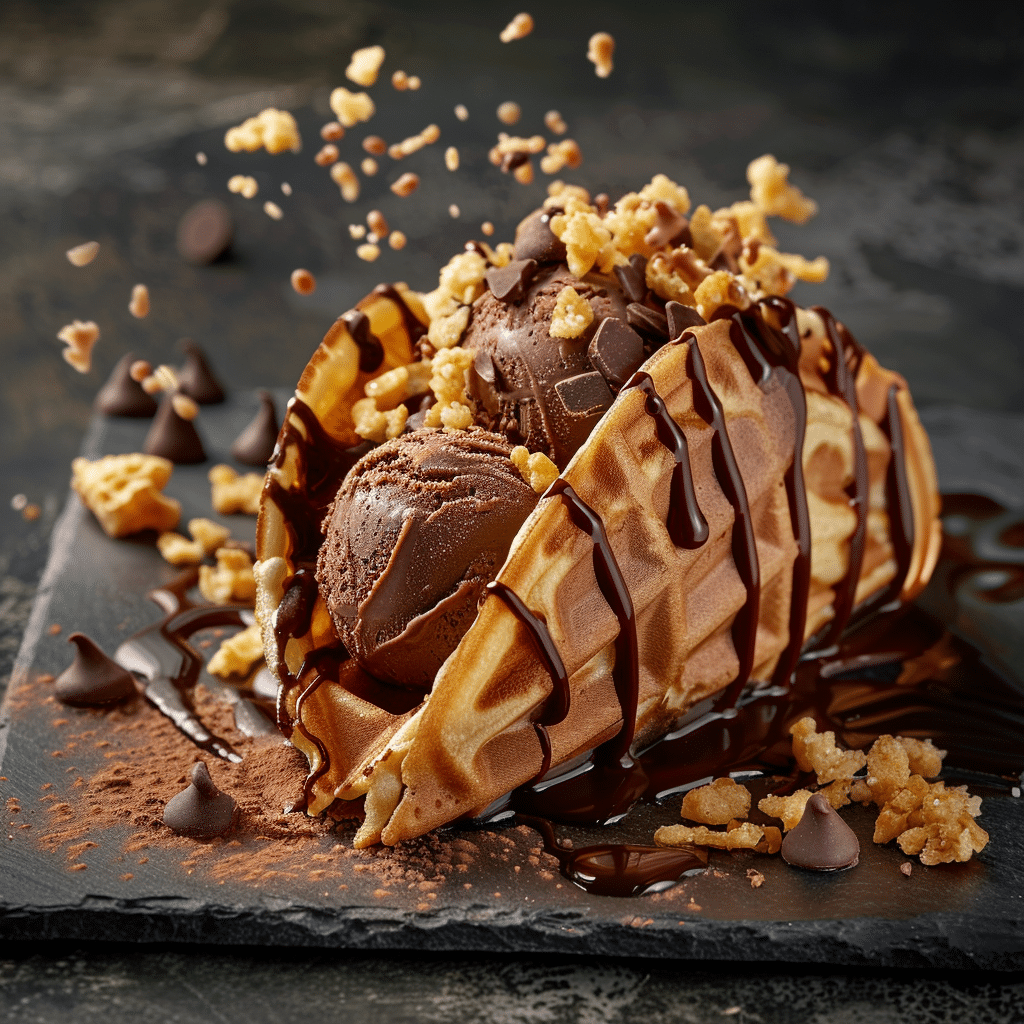
Start by gently warming your chocolate until it’s melted and silky smooth—be sure not to overheat. Next, take the tortillas and brush or dip them evenly with the melted chocolate. While still pliable, carefully fold each tortilla over a rolling pin or a similar object to create the classic taco shell shape. Place them on parchment paper and refrigerate until the chocolate hardens and the shape holds perfectly crisp.
Step 2: Fill with Ice Cream
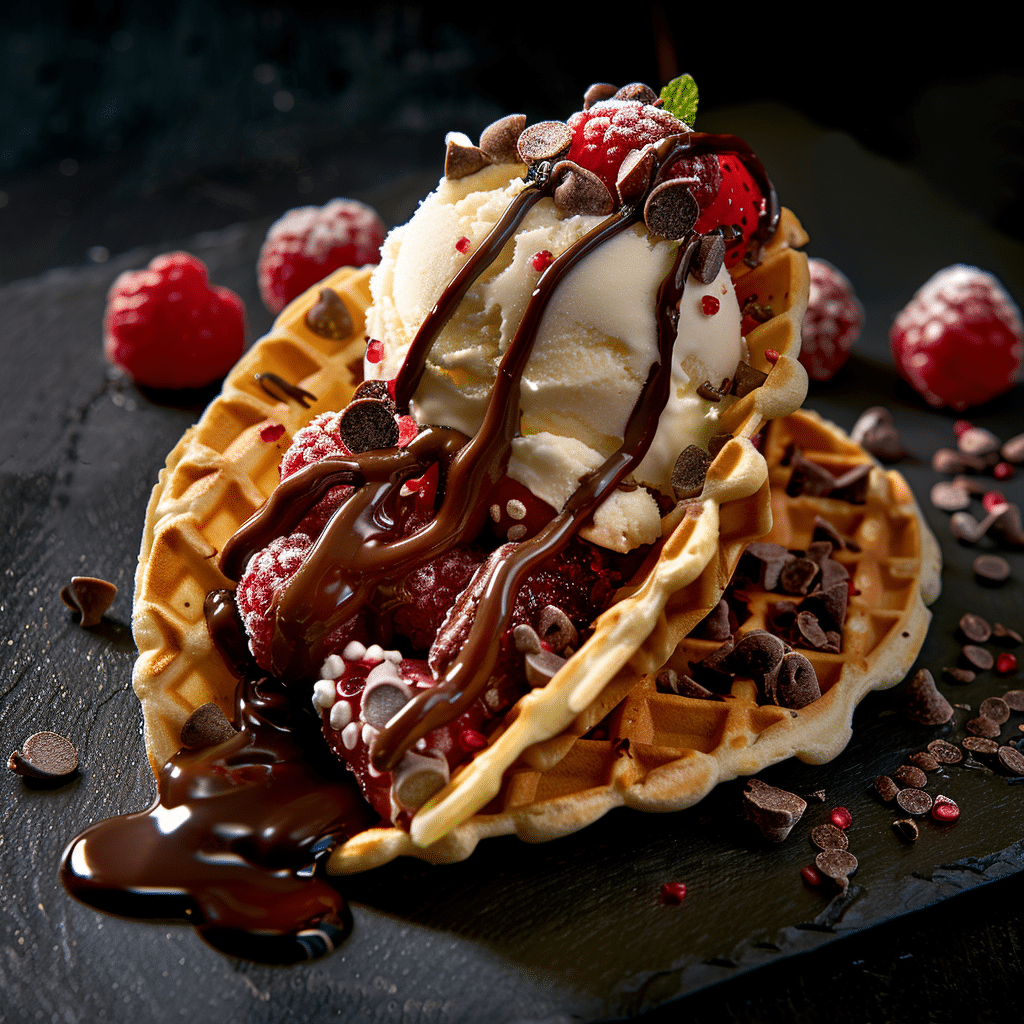
Once the chocolate shells are set and delightfully firm, it’s time for the most fun part—filling! Use a generous scoop of your chosen ice cream and gently fill each shell, allowing the creamy texture to contrast beautifully with the crunchy shell. Work quickly so the ice cream holds its cool consistency.
Step 3: Add Toppings
Now comes the creative bit. Sprinkle on chopped nuts, colorful sprinkles, or fresh fruit to enhance the flavor and add exciting textures. If you like, a drizzle of chocolate syrup or caramel can add a rich, decadent finish. Finish with a dollop of whipped cream for a classic touch that always brings smiles.
How to Serve Chocolate Taco Dessert 🌮
Garnishes
Garnishing is where your personality shines. Fresh mint leaves, a sprinkle of powdered sugar, or even edible flowers can elevate presentation and make these tacos almost too pretty to eat. Adding these little extras not only brightens the plate but also complements the dessert’s rich flavors.
Side Dishes
Serve these Chocolate Taco Dessert 🌮 creations alongside fresh fruit salads or a small cup of hot coffee or espresso to balance the sweetness. A scoop of sorbet or a tangy cheesecake bite pairs beautifully if you prefer variety on the table.
Creative Ways to Present
Put a playful spin on serving by arranging the chocolate tacos standing upright in a glass or bowl lined with colorful paper shreds or edible gold leaf. You can also create a “dessert taco bar” allowing guests to customize their own creations, which adds an interactive and festive element to any gathering.
Make Ahead and Storage
Storing Leftovers
If you have any leftovers, store the chocolate shells and ice cream separately. Keep the shells in an airtight container at room temperature or in the fridge if your kitchen is warm, so they stay crisp without softening. Ice cream should, of course, stay frozen until just before serving.
Freezing
You can freeze assembled tacos briefly if needed, but the shells might soften due to moisture from the ice cream. For best texture, freeze only the ice cream and add it fresh into your chocolate shells when ready to serve.
Reheating
Since this dessert relies heavily on crisp shells, reheating isn’t recommended because it can melt your chocolate shell unevenly or make it soggy. It’s best enjoyed fresh and cool to appreciate every textural contrast.
FAQs
Can I use flour tortillas of any size for the Chocolate Taco Dessert 🌮?
While you can experiment, smaller tortillas work best because they’re easier to shape into taco shells and provide the perfect bite-sized dessert.
What type of chocolate works best for the shell?
High-quality dark or milk chocolate chips or bars melt beautifully and provide a smooth, glossy coating. Avoid chocolate with a lot of additives for the best set and taste.
Can I make the shells in advance?
Absolutely! You can prepare the chocolate taco shells a day ahead and keep them in an airtight container. Just fill them with ice cream and toppings right before serving.
Are there dairy-free options for the ice cream?
Yes, many delicious dairy-free or vegan ice creams are available and work wonderfully in creating a rich and creamy filling for this dessert.
How should I store assembled Chocolate Taco Dessert 🌮 if not serving immediately?
Since the ice cream will melt and the shell might get soggy, it’s best to assemble the dessert right before serving for optimal texture and flavor.
Final Thoughts
Making a Chocolate Taco Dessert 🌮 is such a joyful experience—combining simple ingredients into a uniquely fun and delicious creation that’s sure to bring smiles. Whether you’re treating yourself or looking to dazzle friends, this dessert’s playful presentation and rich flavor make it a must-try. Dive in and enjoy every crunchy, creamy bite!