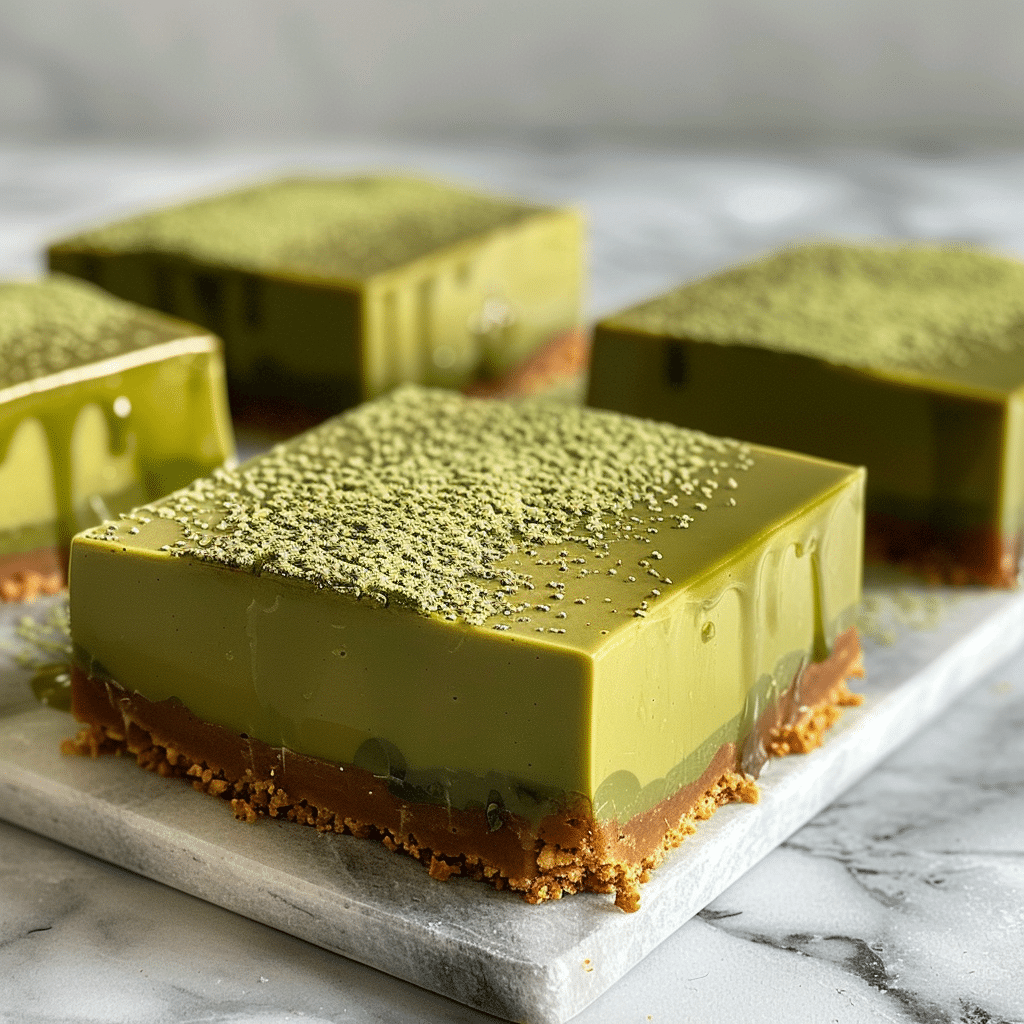
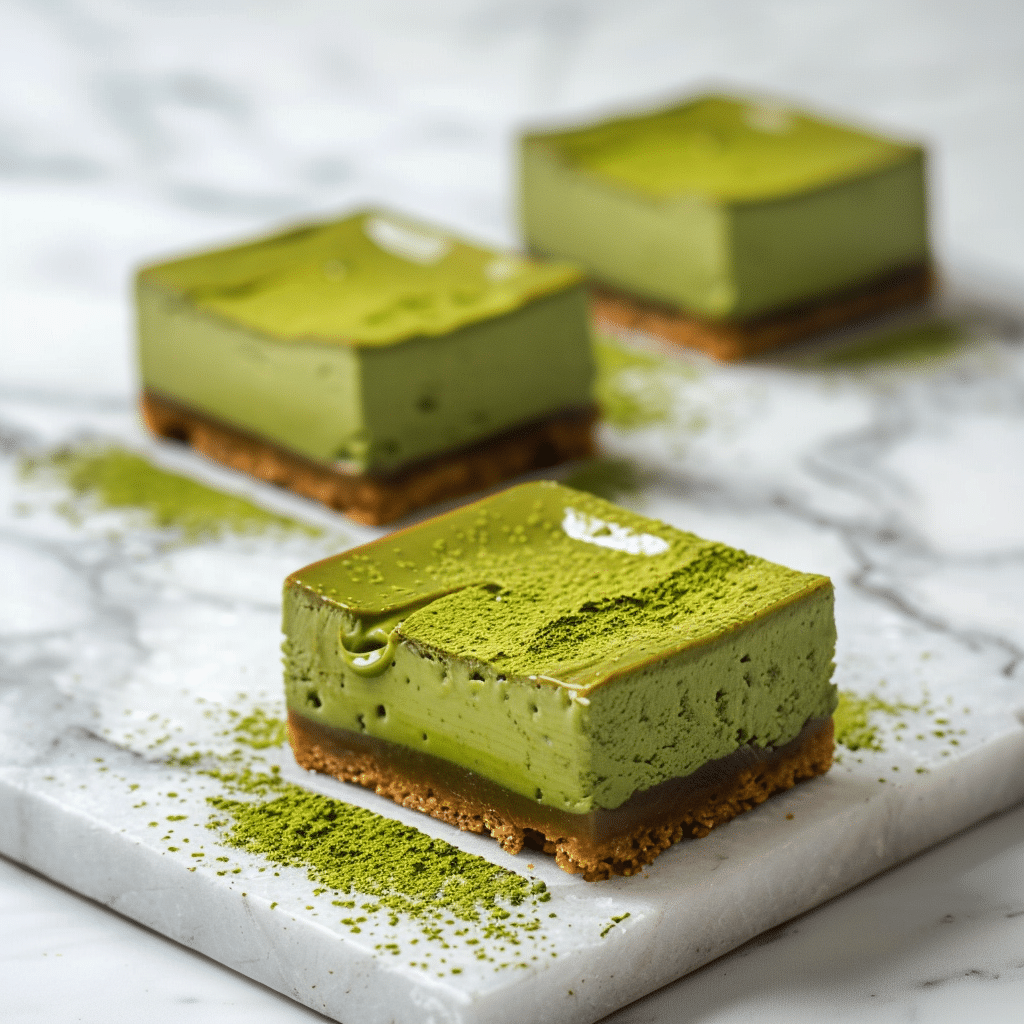
Matcha Lava Cheesecake Bars 🍵 Recipe
If you are on the hunt for a dessert that combines elegance, comfort, and a little touch of adventure, these Matcha Lava Cheesecake Bars 🍵 are exactly what you need. Imagine a luscious, creamy cheesecake with a smooth outer layer that hides a molten, velvety matcha center that oozes delightfully when you cut into it. This dessert is not just a treat for your taste buds but also a feast for your eyes, bringing a vibrant green hue that brightens up any sweet spread. Whether you are serving guests or enjoying a quiet moment with tea, these bars strike the perfect balance of richness and subtle earthiness, making them an unforgettable experience.
Ingredients You’ll Need
Creating these Matcha Lava Cheesecake Bars 🍵 is simpler than you might think. Each ingredient plays a crucial role, from the creaminess of the cheese to the vibrant matcha powder that gives the bars their signature color and flavor.
- Cream Cheese: This provides the rich and creamy base essential for a smooth cheesecake texture.
- Granulated Sugar: Just enough sweetness to balance the matcha’s slight bitterness.
- Eggs: They bind the ingredients and give the bars a perfect set without being too dense.
- Matcha Powder: The star ingredient that infuses the bars with that unmistakable green tea flavor and vibrant color.
- Heavy Cream: Adds silkiness and moisture, ensuring your cheesecake bars are luscious and not dry.
- Butter: For the crust, providing a buttery foundation with a hint of crispness.
- Graham Crackers or Digestive Biscuits: To make the crunchy, flavorful crust contrasting perfectly with the creamy filling.
How to Make Matcha Lava Cheesecake Bars 🍵
Step 1: Prepare the Crust
Begin by crushing the graham crackers or digestive biscuits finely, then mix them with melted butter until the crumbs are evenly coated. Press this mixture firmly into your baking pan to create the sturdy base that will hold your creamy cheesecake layers and molten center perfectly.
Step 2: Make the Cheesecake Batter
Beat the cream cheese until smooth and fluffy, then gradually add sugar and eggs, blending thoroughly to avoid lumps. Pour in the heavy cream and mix gently until everything is just combined—this will ensure your cheesecake layers are silky with a melt-in-your-mouth texture.
Step 3: Add the Matcha Lava Center
Reserve some of the cheesecake batter and mix it with the matcha powder until the color is vivid and the taste rich. Pour most of the plain cheesecake batter onto the crust first, then dollop in the matcha mixture strategically around the pan. With a skewer or toothpick, swirl the two mixtures slightly to create a molten effect that will ooze as the bars bake.
Step 4: Bake Lightly
Bake the bars at a moderate temperature, just enough so the outer layer sets while the center remains molten and creamy. Keep a close eye to avoid overbaking, as the magic happens when the inside is still soft but the outside has a nice, gentle firmness.
How to Serve Matcha Lava Cheesecake Bars 🍵
Garnishes
Enhance your Matcha Lava Cheesecake Bars 🍵 by sprinkling a light dusting of matcha powder or powdered sugar on top. Fresh berries, like raspberries or strawberries, add a pop of color and a bright contrast to the earthy green. For a little crunch, toasted white chocolate shavings or crushed pistachios make excellent companions.
Side Dishes
Pair these bars with a simple cup of green tea to complement the matcha flavor or a dollop of whipped cream infused with a hint of citrus zest to brighten the palate. Light fruit salads with citrus or tropical notes also work wonderfully alongside this dessert.
Creative Ways to Present
For a stunning presentation, serve the bars on a wooden board or slate plate with edible flowers scattered around. You can also cut them into bite-sized squares and insert small skewers for elegant finger food at parties. Drizzling a little white chocolate sauce around the plate adds flair and extra indulgence.
Make Ahead and Storage
Storing Leftovers
Store any leftover Matcha Lava Cheesecake Bars 🍵 in an airtight container in the refrigerator. They will stay fresh and delicious for up to 4 days, with the lava center maintaining its soft texture beautifully.
Freezing
If you want to keep these bars longer, wrap them tightly in plastic wrap and foil before freezing. They freeze well for up to 2 months. When ready to enjoy, thaw them in the refrigerator overnight for the best consistency.
Reheating
To bring back that molten lava effect after chilling, reheat the bars gently in a low oven for 5 to 7 minutes or until the center just begins to soften. Avoid overheating, which can dry out the cheesecake.
FAQs
Can I use a different type of tea powder instead of matcha?
While matcha provides a unique flavor and vibrant color, you could experiment with other finely ground green teas or even chai spices, but the texture and color might differ from the classic Matcha Lava Cheesecake Bars 🍵 experience.
Is it necessary to use heavy cream?
Heavy cream really contributes to the creamy texture of the cheesecake. You might substitute with full-fat sour cream or crème fraîche, but the bars may be less rich and silky.
How do I know when the bars are perfectly baked?
Look for a slight jiggle in the center when you gently shake the pan. The edges should be set and lightly golden, while the lava center retains softness—that’s the sweet spot for these bars.
Can I make these bars gluten-free?
Yes! Simply swap the graham crackers or digestive biscuits for gluten-free alternatives, and make sure your matcha powder and other ingredients are certified gluten-free to keep the bars safe for sensitive diets.
What is the best pan size to use?
Using an 8×8 inch square pan or something similar works perfectly, as it gives enough depth for the creamy layers and molten center to develop just right.
Final Thoughts
Trying the Matcha Lava Cheesecake Bars 🍵 is like inviting a little moment of magic into your kitchen and your day. They blend creamy cheesecake comfort with the exciting surprise of molten matcha in the center, a luscious twist that will keep you coming back for more. So go ahead, give this recipe a whirl—your taste buds and your guests will thank you for it!