Indulge in 7 Reasons to Love Chocolate Tart Recipe
If you have a soft spot for desserts that feel like a warm hug, then get ready to Indulge in 7 Reasons to Love Chocolate Tart. This recipe brings together a crisp, cocoa-kissed crust and a luxuriously creamy, bittersweet chocolate filling that’s simply irresistible. Each bite melts effortlessly on your tongue, delivering a perfect harmony of rich flavors and textures that make it a standout dessert for any occasion. Whether you’re treating yourself or impressing guests, this tart has seven fantastic reasons to become your new favorite indulgence.
Ingredients You’ll Need
The magic behind this tart lies in a handful of simple but carefully chosen ingredients, each playing a crucial role in building that perfect balance of taste, texture, and visual appeal. From the cocoa powder dusting the crust to the smooth dark chocolate in the filling, every component elevates the final masterpiece.
- 1 1/4 cups all-purpose flour: The sturdy base that forms the crisp and tender crust every great tart needs.
- 1/2 cup unsweetened cocoa powder: Adds a deep, rich chocolate flavor and gorgeous dark color to the crust.
- 1/2 cup powdered sugar: Provides just the right sweetness and a silky texture to the dough.
- 1/2 cup unsalted butter, softened: Essential for that buttery, melt-in-your-mouth crumbly crust.
- 1/4 teaspoon salt: Enhances the chocolate flavors and balances the sweetness beautifully.
- 1 large egg yolk: Binds the dough and adds richness to the crust’s texture.
- 1 cup heavy cream: Creates the smooth, velvety filling that’s the heart of this tart.
- 8 oz dark chocolate, chopped: Use high-quality chocolate for an intense and sophisticated flavor.
- 2 tablespoons sugar: Sweetens the cream and offsets any bitterness in the chocolate.
- 1 teaspoon vanilla extract: Lends warmth and depth to the luscious filling.
How to Make Indulge in 7 Reasons to Love Chocolate Tart
Step 1: Prepare the Tart Crust
Begin by preheating your oven to 350°F (175°C). In a large mixing bowl, combine the all-purpose flour, unsweetened cocoa powder, powdered sugar, and a pinch of salt. Adding the softened unsalted butter and egg yolk, gently mix everything together until you form a cohesive dough. Press this dough evenly into a tart pan, making sure to reach the edges for a nicely shaped crust. Bake for 15 minutes, then set aside to cool completely before filling. This step is what lays down the foundation for your decadent chocolate tart.
Step 2: Make the Chocolate Filling
While your crust is cooling, bring the heavy cream and sugar to a gentle simmer in a saucepan over medium heat. As soon as it starts to bubble lightly, remove it from the heat and immediately add the chopped dark chocolate. Let it sit for a minute, then stir until silky smooth. Finish with a teaspoon of vanilla extract to round out the flavor beautifully. This rich ganache-like filling is what will have you coming back for second (and third) slices.
Step 3: Assemble and Chill
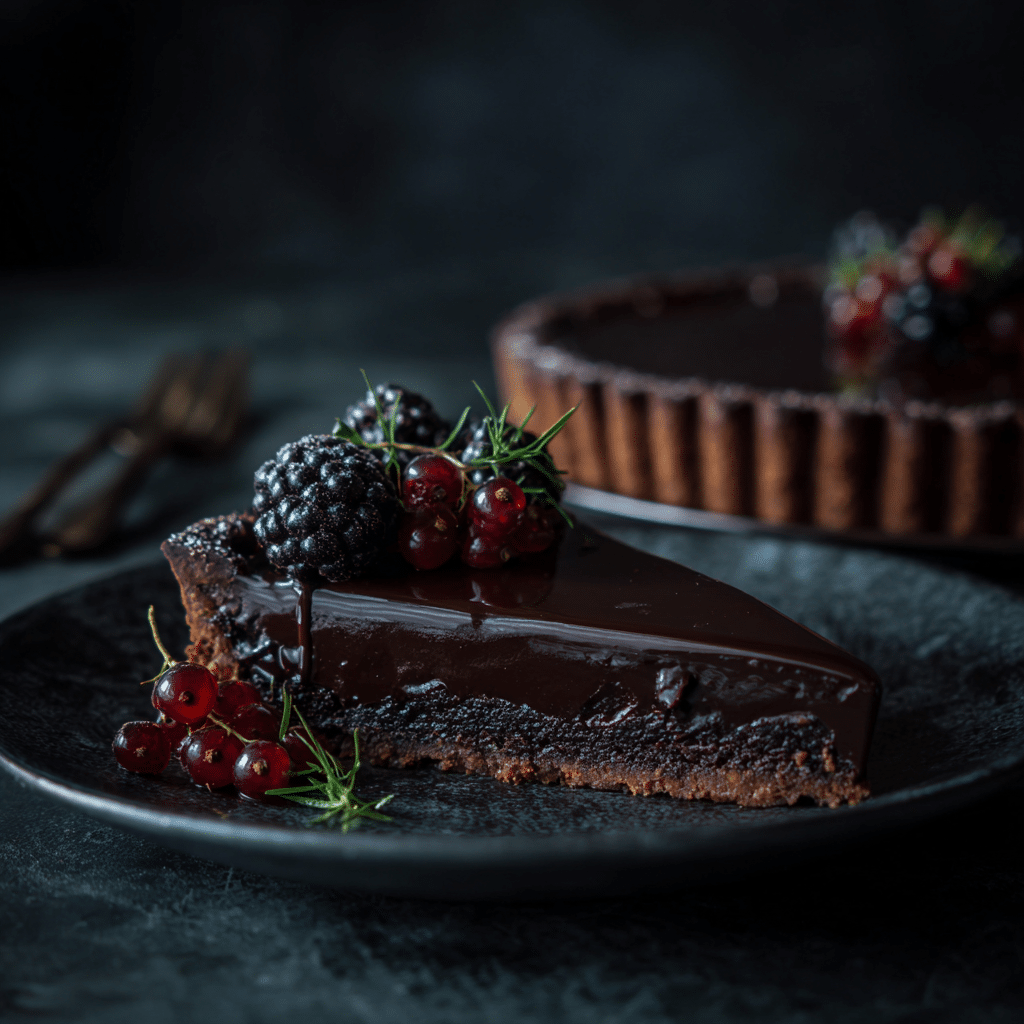
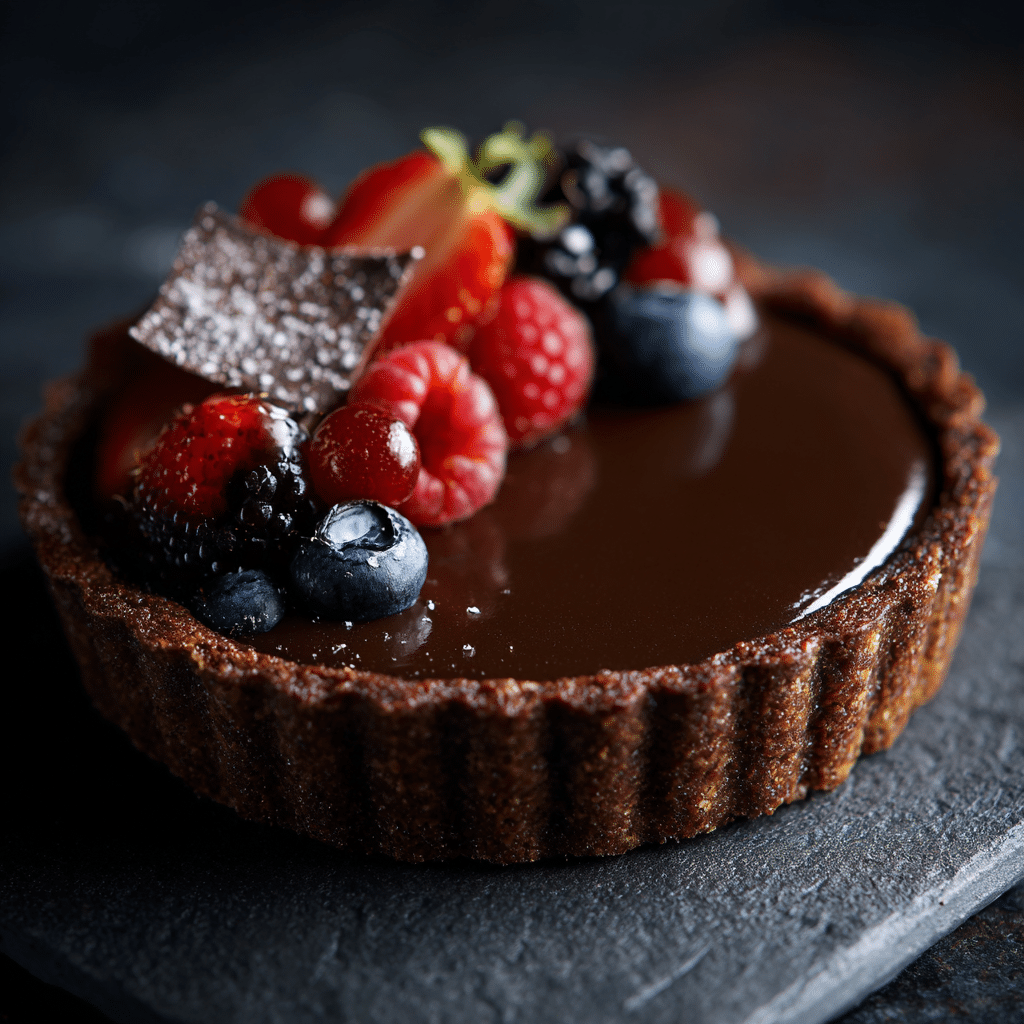
Pour the luscious chocolate filling directly into your cooled tart shell, smoothing it out evenly with a spatula. To achieve that perfect set with a gorgeous sheen, refrigerate the tart for at least 2 hours. This chilling step enhances the flavors and firms up the filling so each slice holds its shape while remaining silky and decadent.
How to Serve Indulge in 7 Reasons to Love Chocolate Tart
Garnishes
Garnishing your chocolate tart can take it from delicious to unforgettable. Fresh raspberries or strawberries add a burst of color and a fruity contrast to the rich chocolate. A dollop of freshly whipped cream or a sprinkle of flaky sea salt can also elevate the overall experience by providing texture and brightness.
Side Dishes
Pair your tart with a light side such as a delicate salad of arugula and citrus to balance the richness, or a scoop of vanilla bean ice cream that complements the deep chocolate notes. Even a cup of freshly brewed espresso or a glass of dessert wine works wonders alongside this sophisticated treat.
Creative Ways to Present
For a bit of flair, try serving individual mini chocolate tarts in ramekins or use edible gold leaf for an elegant touch. You might also drizzle caramel sauce or dust the top with additional cocoa or powdered sugar for that perfect finish. Presentation is key to showcasing the seven reasons you should indulge in this chocolate tart again and again.
Make Ahead and Storage
Storing Leftovers
Once you’ve enjoyed your tart, store any leftovers covered tightly in the refrigerator. This will keep the crust crisp and the filling smooth for up to 3 days. Allow it to come to room temperature for 15-20 minutes before serving for the best taste and texture.
Freezing
If you want to save this delightful dessert for later, freezing is a viable option. Wrap the tart securely in plastic wrap and foil, then freeze for up to one month. Thaw overnight in the fridge before serving and consider adding a fresh garnish to revive its charm.
Reheating
Chocolate tart is best served chilled, but if you prefer a warmer treat, gently bake slices in a low oven (about 300°F or 150°C) for 5-7 minutes. This will soften the filling slightly without compromising the crust’s integrity. Keep a close eye so it doesn’t overheat.
FAQs
Can I use milk chocolate instead of dark chocolate?
While you can substitute milk chocolate, the tart’s rich and slightly bitter balance might change. Dark chocolate provides a deeper flavor and less sweetness, which complements the cocoa crust perfectly.
Is it possible to make this tart gluten-free?
Absolutely! Swap the all-purpose flour with a gluten-free flour blend that measures cup-for-cup. You might need to adjust the baking time slightly and keep an eye on the texture, but it will still be delicious.
How do I prevent the crust from becoming soggy?
Ensure the crust is fully baked before adding the filling and that you chill the tart properly. Using a tart pan with a removable bottom can help with even baking. Also, letting the tart sit at room temperature for a bit before slicing prevents moisture buildup.
Can I prepare the crust a day in advance?
Yes! Making the crust ahead of time is a great way to save effort on the day of serving. Just keep it refrigerated, wrapped tightly, and fill it with the chocolate ganache when you’re ready.
What’s the best way to cut neat slices?
Use a sharp knife dipped in hot water and wiped dry between slices. This keeps the edges clean and prevents the filling from sticking to the knife.
Final Thoughts
Now that you know how to Indulge in 7 Reasons to Love Chocolate Tart, it’s time to roll up your sleeves and create this decadent dessert yourself. Each step is a joy, and the result is a stunning chocolate tart that brings smiles to every gathering. Whether for celebrations or a cozy night in, this recipe promises a chocolate experience worth savoring again and again.