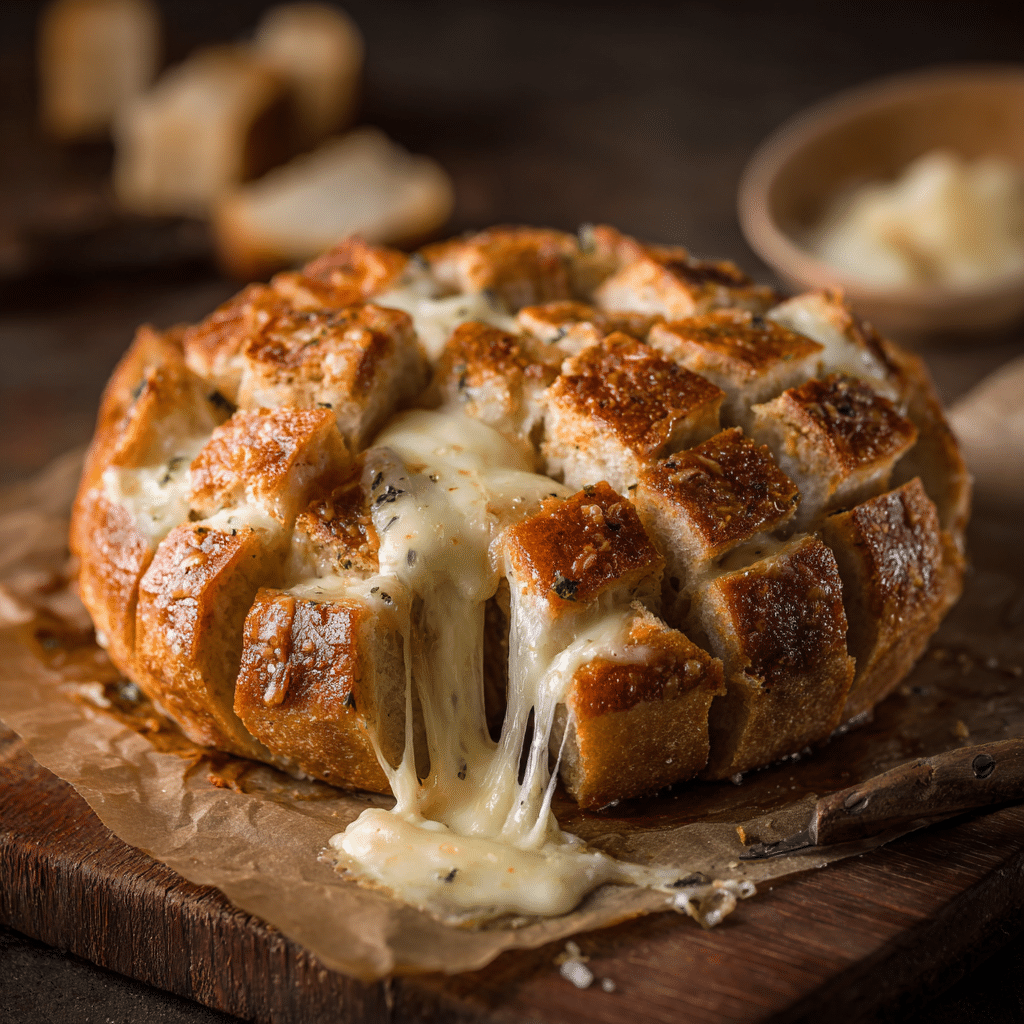
Cheesy Pull-Apart Bread Recipe
If you have a craving for something irresistibly gooey and irresistibly shareable, Cheesy Pull-Apart Bread is your new best friend. This delightful dish takes a simple loaf of bread and transforms it into a warm, cheesy masterpiece that’s perfect for any occasion. Imagine soft, golden bread pockets bursting with melted mozzarella, fragrant garlic butter, and a sprinkle of fresh herbs—every pull delivers a little bite of heaven. Whether you’re serving it for a cozy family dinner or a lively gathering with friends, this Cheesy Pull-Apart Bread will quickly become a go-to favorite in your recipe collection.

Ingredients You’ll Need
Putting together the perfect Cheesy Pull-Apart Bread is all about the harmony of a few simple, quality ingredients. Each element plays a crucial role, ensuring a perfect balance of flavor, texture, and aroma that will keep everyone reaching for more.
- 1 loaf bread: Choose a crusty yet soft loaf, like sourdough or artisan white bread, to provide a sturdy base that crisps up beautifully.
- 1 cup shredded mozzarella: The star of the show, mozzarella melts beautifully and creates those irresistible gooey pull-apart strands.
- 2 tbsp butter, melted: Butter adds richness and helps everything toast to golden perfection while infusing each bite with savory warmth.
- 1 tsp garlic powder: A punch of garlic flavor that soaks into the bread, elevating the taste without overpowering the cheese.
- Fresh parsley: A fresh, vibrant garnish that adds color and a fragrant hint of green to balance the richness.
How to Make Cheesy Pull-Apart Bread
Step 1: Prepare the Bread for Stuffing
Start by taking your loaf and cutting it carefully into cubes, but don’t slice all the way through the bottom—this ensures the loaf stays intact and easy to pull apart after baking. This technique creates little pockets that will hold all the delicious fillings.
Step 2: Stuff with Cheese and Brush with Butter
Generously stuff shredded mozzarella into all the spaces created by the cuts. Next, mix your melted butter with garlic powder and brush it over the top, making sure it seeps into the cracks so the bread absorbs all that garlicky goodness as it bakes.
Step 3: Bake to Golden Perfection
Place your stuffed loaf on a baking tray and bake in a preheated oven at 180°C (350°F) for about 25 minutes. The cheese should be melted and bubbly, and the top of the bread turning a gorgeous golden brown, signaling it’s ready to come out and wow your taste buds.
Step 4: Garnish and Serve Warm
After baking, sprinkle freshly chopped parsley over the top. This final touch brightens the flavors and adds a pop of inviting color, making your Cheesy Pull-Apart Bread as beautiful as it is delicious.
How to Serve Cheesy Pull-Apart Bread
Garnishes
A sprinkle of fresh parsley or even some chopped chives gently tossed on top creates a stunning visual contrast and lifts the rich flavors with a refreshing herbal note. For extra flair, you can add a light dusting of parmesan or a drizzle of olive oil infused with chili flakes.
Side Dishes
Cheesy Pull-Apart Bread shines alongside hearty soups like tomato basil or creamy potato leek, making it a perfect partner for soaking up savory broth. It also pairs wonderfully with fresh green salads or a plate of cured meats, turning any meal into a celebration of textures and tastes.
Creative Ways to Present
Serve the bread on a rustic wooden board surrounded by small bowls of marinara sauce, pesto, or roasted garlic aioli for dipping. You can also transform it into a centerpiece by placing it in a cast-iron skillet, inviting everyone to pull apart cheesy bites straight from the oven, bringing a fun and interactive element to your table.
Make Ahead and Storage
Storing Leftovers
If you have any leftovers (and we know it’s hard!), wrap the bread tightly in aluminum foil or plastic wrap and store it in the refrigerator. It should stay fresh for up to 2 days, preserving the cheesiness and softness as much as possible.
Freezing
To enjoy Cheesy Pull-Apart Bread later, freeze the fully assembled but unbaked loaf in a tightly sealed bag or container. When you’re ready, simply bake it straight from frozen, adding a few extra minutes to the cooking time to ensure the cheese melts perfectly.
Reheating
For reheating, the oven is your best friend to revive the crispy crust and melty cheese. Preheat to 180°C and warm the bread for about 10 minutes, uncovered to keep that delicious texture. Avoid microwaving, which can make the bread soggy and the cheese rubbery.
FAQs
Can I use other types of cheese in Cheesy Pull-Apart Bread?
Absolutely! While mozzarella is classic for its melting qualities, you can experiment with cheddar, provolone, or even pepper jack for a little spice. Mixing cheeses can add extra depth and flavor to your pull-apart experience.
What type of bread works best for this recipe?
A crusty loaf with a soft interior like sourdough, French bread, or artisan white bread works best. Avoid very dense or pre-sliced sandwich bread, as it won’t hold up well to the stuffing and baking process.
Can I make Cheesy Pull-Apart Bread vegan?
Yes! Use a vegan butter substitute and plant-based shredded cheese alternatives. Make sure your bread is also vegan-friendly. The final result may vary slightly in flavor but will still be delicious and satisfying.
How do I prevent the bread from getting soggy?
Brushing the cut sections generously with melted butter helps create a barrier that keeps the bread moist but not soggy. Also, baking at the right temperature ensures the crust crisps up nicely while the cheese melts inside.
Is this recipe suitable for kids?
Definitely! Kids love the gooey, cheesy goodness and the fun of pulling apart the bread themselves. It’s a fantastic way to get them involved in the kitchen and enjoy a crowd-pleasing snack or side.
Final Thoughts
There’s something undeniably comforting about tearing into a warm loaf of Cheesy Pull-Apart Bread, with cheese stretching delightfully between your fingers and that buttery, garlicky aroma filling the air. It’s simple to make, shares well, and tastes absolutely divine, making it a must-try for any cheese lover. I hope this recipe inspires you to create your own gooey, golden masterpiece and share it with the people you love!