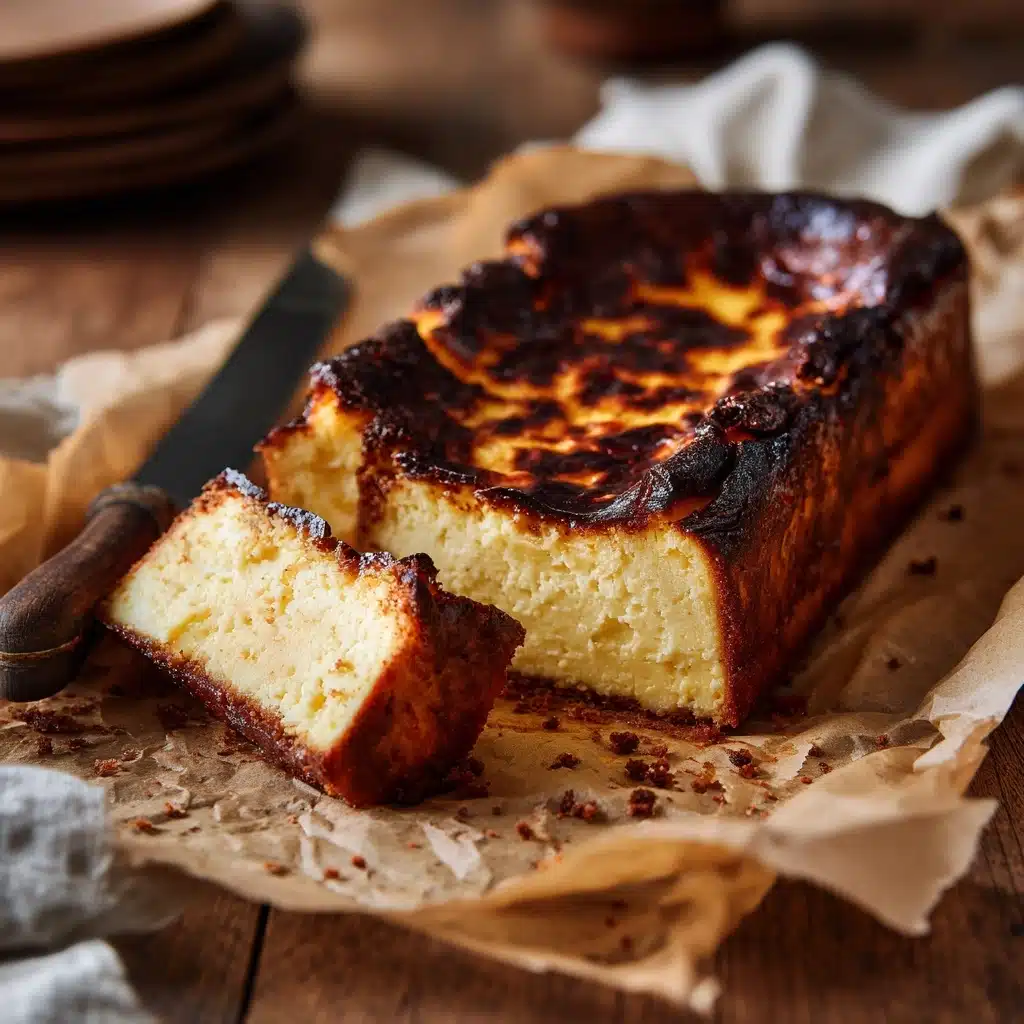
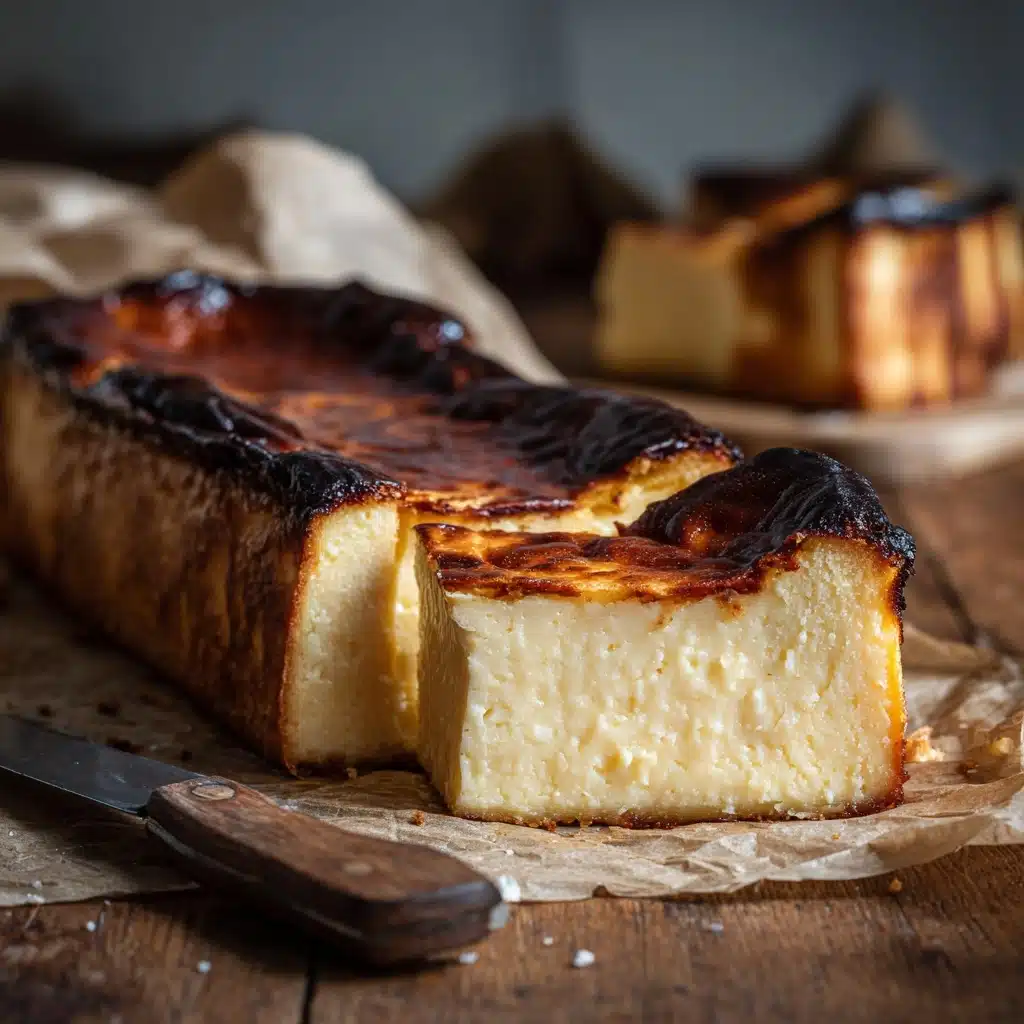
Burnt Basque Cheesecake in a Loaf Pan Recipe
If you’ve ever dreamt of tasting a luscious cheesecake with a caramelized crust and a custard-like center but wondered how to make it in smaller portions, then this Burnt Basque Cheesecake in a Loaf Pan recipe is exactly what you need. It captures all the magic of the classic Basque cheesecake—rich, creamy, and beautifully burnt on top—while being perfectly sized for a cozy treat that’s easy to share or savor all on your own. Baking it in a loaf pan brings a delightful twist that’s great for slicing up delicate pieces jam-packed with flavor and velvety texture.
Ingredients You’ll Need
These ingredients are wonderfully simple yet essential; each one plays a starring role in creating the signature creamy texture, subtle sweetness, and that perfect burnt finish that define a genuinely indulgent Basque cheesecake.
- Cream cheese (1 1/2 cups, softened): Full-fat cream cheese gives the cheesecake its rich, silky body and smooth mouthfeel.
- Granulated sugar (1/2 cup): For just the right amount of sweetness that balances the tang of the cream cheese perfectly.
- Eggs (2 large, room temperature): These act as a binder, adding structure while keeping the cheesecake custardy inside.
- Heavy cream (3/4 cup): This adds luxurious creaminess and depth, making each bite decadently smooth.
- Vanilla extract (1/2 teaspoon): A subtle flavor enhancer that brightens the cheesecake without overpowering it.
- Salt (1/8 teaspoon): Just a pinch to balance sweetness and deepen the flavors.
- All-purpose flour (1 tablespoon): Helps stabilize the cheesecake, ensuring it holds together beautifully when sliced.
How to Make Burnt Basque Cheesecake in a Loaf Pan
Step 1: Prepare Your Pan
Start by preheating your oven to 400°F (200°C). Line your loaf pan with parchment paper, making sure to leave some overhang on the sides. This little trick guarantees you can effortlessly lift the cheesecake out when it’s done without any fuss or crumbling.
Step 2: Whip Up the Cream Cheese Mixture
Using a large mixing bowl, beat the softened cream cheese with the granulated sugar until the batter is completely smooth and fluffy—this usually takes a few minutes. This step is crucial because it sets the stage for that silky texture we love in a Burnt Basque Cheesecake in a Loaf Pan.
Step 3: Add Eggs One at a Time
Next, crack in your eggs one by one, mixing well after each addition. This slow incorporation helps create a smooth, even batter without lumps or curdling.
Step 4: Incorporate Cream and Flavors
Pour in the heavy cream, vanilla extract, and salt, then beat again until everything is fully combined and delightfully silky. The cream adds richness while vanilla and salt balance the cheesecake’s flavor profile to perfection.
Step 5: Fold in the Flour
Sift the all-purpose flour over the batter and gently fold it in just until combined. This careful folding maintains the mixture’s airiness and keeps the texture from becoming too dense.
Step 6: Bake to Perfection
Pour your luscious batter into the prepared loaf pan, then give the pan a gentle tap on the counter to release trapped air bubbles. Bake in your preheated oven for 40 to 45 minutes, until the top has developed that iconic deep golden color and the center still jiggles slightly when you gently shake the pan.
Step 7: Cool and Chill
Once out of the oven, let the cheesecake cool to room temperature in the pan—it will continue to set as it cools. Then, transfer it into the fridge for at least 4 hours or, ideally, overnight. This chilling step is vital for achieving that signature custard-like center and making slicing easier.
How to Serve Burnt Basque Cheesecake in a Loaf Pan
Garnishes
Although this cheesecake stands proudly on its own, adding a few simple garnishes can elevate the experience. Fresh berries like raspberries or strawberries add a pop of color and a touch of tart contrast. A light dusting of powdered sugar or a drizzle of honey also complements the caramelized crust beautifully without overpowering the natural flavors.
Side Dishes
A scoop of homemade vanilla ice cream or a dollop of whipped cream is a wonderfully classic pairing, making each slice feel like a mini celebration. If you want something fruitier, a small bowl of mixed fruit compote pairs wonderfully with the rich, creamy cheesecake’s mellow sweetness.
Creative Ways to Present
For a charming presentation, slice your Burnt Basque Cheesecake in a Loaf Pan into thick, rustic pieces and serve on wooden boards or slate plates. Add edible flowers or a sprig of mint for a fresh, elegant finish. For parties, consider pairing each slice with a tiny drizzle of balsamic glaze or a sprinkle of toasted nuts for a delightful crunch.
Make Ahead and Storage
Storing Leftovers
Leftover cheesecake can be covered tightly with plastic wrap or stored in an airtight container in the refrigerator. It will keep its creamy texture and flavor for up to 4 days, making it perfect for enjoying again without any loss of quality.
Freezing
If you want to save cheesecake for longer, slice it into individual portions and wrap each slice in plastic wrap followed by aluminum foil, then freeze. This protects it from freezer burn and helps preserve its texture. Frozen cheesecake lasts up to 2 months.
Reheating
To enjoy frozen cheesecake, thaw it overnight in the refrigerator. While it’s best served chilled, if you prefer it slightly warm, pop a slice in the microwave for 10 to 15 seconds—just enough to take the chill off without melting the texture.
FAQs
Can I use a different pan instead of a loaf pan?
Absolutely! While the loaf pan gives this Burnt Basque Cheesecake a unique shape and easy slicing, a standard round cake pan works just as well. Just be mindful of baking time, as thinner batters may cook faster.
Why does the cheesecake need to be burnt on top?
The burnt top creates a deep caramelized flavor that contrasts beautifully with the creamy, rich center. It’s a hallmark of the Basque style and adds a slightly smoky, complex taste that makes this cheesecake so memorable.
Can I make this cheesecake gluten-free?
Yes! Just swap the all-purpose flour for an equal amount of gluten-free flour or cornstarch. This will maintain the cheesecake’s texture while keeping it safe for gluten-sensitive diets.
Do I have to chill the cheesecake overnight?
Chilling for at least 4 hours is essential for the best texture, as it allows the custard center to set completely. Overnight chilling is ideal because it intensifies the flavors and makes slicing cleaner.
Can I prepare the batter in advance?
While you can make the batter ahead, it’s best to bake it fresh. The batter may lose some of its fluffiness and glaze if left sitting too long before baking, which can affect the cheesecake’s texture.
Final Thoughts
There’s nothing quite like the joy of biting into a slice of Burnt Basque Cheesecake in a Loaf Pan—its caramelized crust giving way to a luxuriously creamy, tender interior that feels like a warm hug. Whether you’re making it for a special occasion or a simple indulgence, this recipe is guaranteed to impress yourself and anyone lucky enough to share. Give it a try, and you’ll find this rich, easy-to-make cheesecake quickly becoming a beloved favorite you’ll want to make again and again.