Chocolate Pavlova
If you adore desserts that perfectly balance crunchy and soft textures with a luscious chocolate twist, this Chocolate Pavlova is your new best friend in the kitchen. Crisp on the outside with a dreamy, marshmallow-like center, it’s crowned with indulgently smooth chocolate whipped cream, making it an effortless showstopper that brings warmth and joy to any gathering or festive table. Every bite feels like a celebration of simple ingredients transformed into something magical.
Ingredients You’ll Need
These ingredients are straightforward but crucial, each adding its own unique touch to the flavor, texture, and rich color that define the perfect Chocolate Pavlova. Using quality components will elevate your dessert experience to the next level.
- 4 large egg whites, at room temperature: The foundation for that airy, crisp meringue texture you crave.
- Pinch of salt: Enhances the egg whites’ flavor and stability as they whip up.
- 1 tsp pure vanilla extract: Adds a subtle sweetness and depth to the meringue.
- 1 cup sugar: For that glossy finish and sweetness; super fine or baker’s sugar dissolves best.
- 2 Tbsp Dutch-process unsweetened cocoa powder: Provides a rich, deep chocolate color and flavor without bitterness.
- 2 tsp cornstarch: Keeps the inside soft while the outside crisps beautifully.
- 1/2 tsp lemon juice or vinegar: Balances sweetness and helps stabilize the meringue.
- Chocolate whipped cream: The crowning glory made with cold heavy cream, sifted cocoa powder, powdered sugar, vanilla, and a pinch of salt for smooth, fluffy topping.
How to Make Chocolate Pavlova
Step 1: Prepare Your Oven and Sugar Mixture
Start by preheating your oven to 250°F and line a baking sheet with parchment paper. Whisk the sugar and sifted Dutch-process cocoa powder together in a small bowl. This ensures the cocoa powder blends evenly into the meringue, giving it that beautiful chocolaty hue and subtle richness.
Step 2: Whip the Egg Whites
Using a clean, dry bowl and your stand mixer, beat the egg whites with a pinch of salt on medium speed until foamy, then crank it up to high. When you see soft peaks form, pour in the vanilla extract. This step is critical—the air you incorporate here is what makes your Chocolate Pavlova so delightfully light and crisp.
Step 3: Add Sugar and Cocoa Mixture Gradually
Slowly add the sugar and cocoa mixture one tablespoon at a time while the mixer runs steadily. This slow incorporation helps the sugar dissolve fully, resulting in that unmistakable glossy finish. Next, beat in cornstarch and lemon juice or vinegar to perfect your meringue’s texture and stability.
Step 4: Shape and Bake
Once your meringue is thick and shiny with stiff peaks, spoon or pipe it onto the prepared baking sheet in an 8-inch circle. Baking at a low temperature for 75 to 90 minutes is key—it allows the outside to set crisp while keeping the center tender and pillowy. Resist the urge to open the oven early; patience here makes all the difference!
Step 5: Cool the Meringue
Turn off the oven, crack the door, and let your pavlova cool inside for one to two hours. This gentle cooling prevents cracks and creates that perfect chewy center we all love in a Chocolate Pavlova.
Step 6: Prepare the Chocolate Whipped Cream
While the meringue cools, whip together cold heavy cream, sifted cocoa powder, powdered sugar, vanilla, and a pinch of salt. Beat to soft-medium peaks — fluffy and cloud-like rather than stiff — so it complements without overwhelming the delicate meringue underneath.
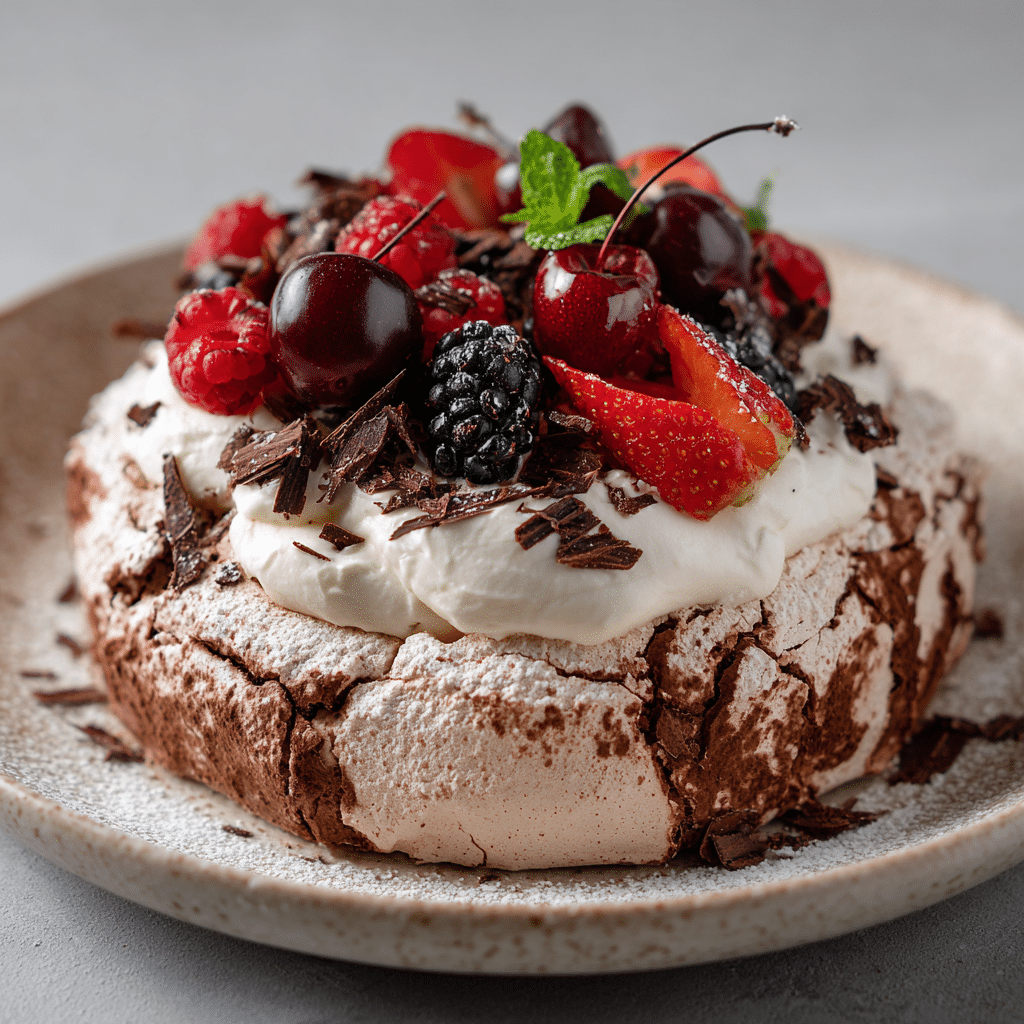
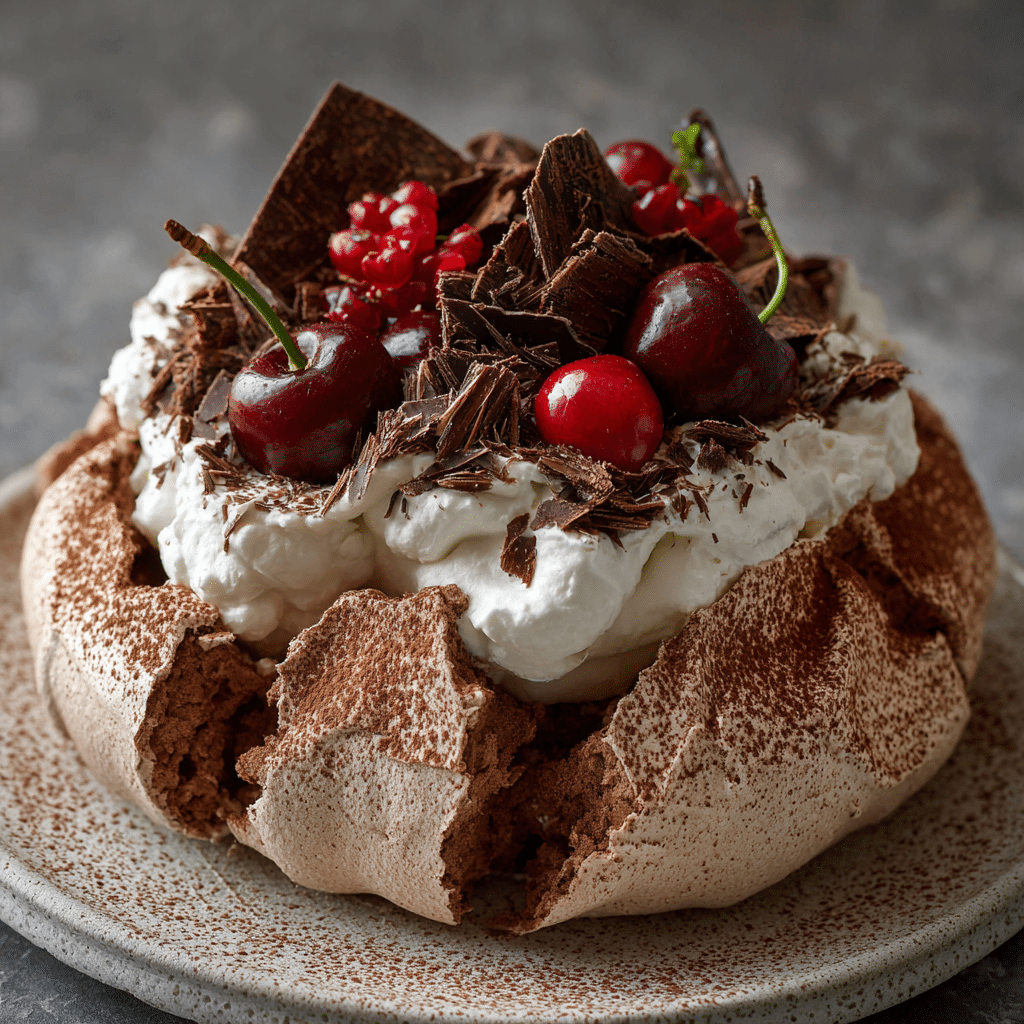
Step 7: Assemble and Garnish
Generously smear the luscious chocolate whipped cream over the cooled pavlova. For an extra touch of elegance and texture, sprinkle with chocolate curls or shavings. Your stunning Chocolate Pavlova is now ready to wow anyone lucky enough to have a slice.
How to Serve Chocolate Pavlova
Garnishes
Besides chocolate curls, fresh berries like raspberries or strawberries add a bright, tart contrast. Toasted nuts or a dusting of cocoa powder can also bring a sophisticated edge. These simple touches enhance both aesthetics and flavor, turning a delicious dessert into a culinary masterpiece.
Side Dishes
Serve your Chocolate Pavlova alongside a refreshing mint leaf or a scoop of vanilla bean ice cream for that cool, creamy balance. A light berry compote or coulis pairs beautifully—adding a juicy, tangy note that complements the sweet chocolate perfectly.
Creative Ways to Present
If you want to dazzle your guests visually, consider individual pavlova nests or even layering shards of pavlova with whipped cream and chocolate mousse in glasses for a stunning parfait. Decorating the plate with drizzles of chocolate sauce or edible flowers elevates presentation to a restaurant-quality experience.
Make Ahead and Storage
Storing Leftovers
Your pavlova is best enjoyed fresh for that crisp contrast, but leftovers can be stored in an airtight container at room temperature for up to two days. Refrigeration is not recommended as it can absorb moisture, making the meringue soggy.
Freezing
For longer storage, freeze the baked meringue shell alone wrapped tightly in plastic wrap and foil for up to a month. Thaw it completely at room temperature before adding the chocolate whipped cream topping for peak texture and flavor.
Reheating
Reheating is generally not advised since it can compromise the delicate crunch of your Chocolate Pavlova. Instead, focus on serving it cool and fresh to maintain that perfect contrast of textures.
FAQs
Can I use regular cocoa powder instead of Dutch-process for the Chocolate Pavlova?
You can, but Dutch-process cocoa powder has a milder, less acidic flavor and darker color, which gives the Chocolate Pavlova a richer taste and deeper chocolate hue. Regular cocoa might taste a bit more bitter and alter the color slightly.
Why is cornstarch added to the pavlova mixture?
Cornstarch helps create that iconic marshmallow-like center while stabilizing the meringue. It absorbs any excess moisture during baking, ensuring the interior stays soft while the outer shell crisps up nicely.
Can I make the Chocolate Pavlova without a stand mixer?
Absolutely! A hand mixer works just as well, though it might take slightly longer to achieve stiff peaks. Just be sure your bowl and beaters are perfectly clean and dry to get maximum volume from your egg whites.
How do I prevent my pavlova from cracking?
Slowly cool your pavlova in the turned-off oven with the door slightly open to prevent sudden temperature changes that cause cracks. Also, avoid opening the oven door frequently during baking, as the temperature drop can affect the texture.
Is the Chocolate Pavlova gluten free?
Yes! This dessert is naturally gluten free, making it a wonderful choice for anyone avoiding gluten without sacrificing flavor or indulgence.
Final Thoughts
Making a Chocolate Pavlova is such a rewarding experience — it feels like a treat you’ve whipped up for cherished company, even if it’s just yourself. Its stunning contrast of textures, subtle chocolate richness, and cloud-like cream topping will surely become a favorite in your recipe collection. Give it a try and enjoy the smiles it brings.