1) Put the eggs in a bowl, mix, then add sugar Recipe
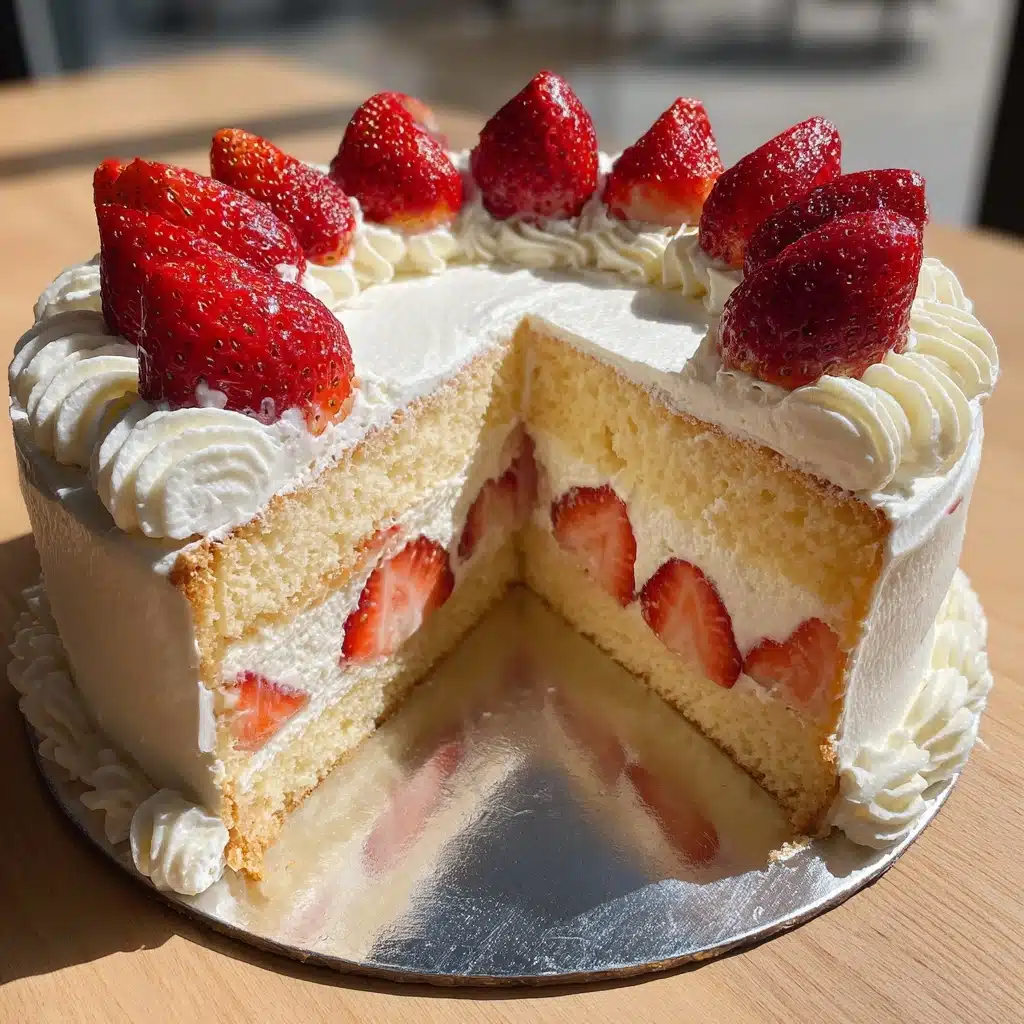
If you’ve ever dreamed of slicing into a cloud-soft treat that’s both delicately sweet and beautifully fresh, then the Japanese Strawberry Sponge Cake is your new best friend. This delightful dessert captures the essence of spring with layers of light, airy sponge, luscious whipped cream, and vibrant strawberries. The secret to getting this irresistible texture lies in a crucial step that every baker must memorize: 1) Put the eggs in a bowl, mix, then add sugar. This simple phrase guides you through creating that fluffy, melt-in-your-mouth sponge that makes this strawberry shortcake so unforgettable.
Ingredients You’ll Need
The beauty of this Japanese Strawberry Sponge Cake is in its simplicity. Each ingredient is essential, working harmoniously to create the cake’s soft texture, light sweetness, and fresh flavor. Let’s break down why each one matters.
- All-purpose flour: Provides the structure but since it’s sifted multiple times, it keeps the texture incredibly light.
- Sugar: Sweetness that balances the tart strawberries and tender crumb.
- Fresh eggs: The star players for aerating and binding the sponge.
- Butter: Adds subtle richness to the batter without weighing it down.
- Whipping cream: Gives the cake its creamy, smooth layer that complements the fruit perfectly.
- Strawberries: Fresh and juicy, they’re the crown jewel of this cake’s flavor and color.
- Syrup (optional): A light soak that keeps the cake moist and adds a hint of sweetness to every bite.
How to Make 1) Put the eggs in a bowl, mix, then add sugar
Step 1: Prepare Your Tools and Ingredients
First things first, preheat your oven to 180°C (356°F). Grease and flour your cake pan to ensure the cake releases easily later. Have your ingredients measured out and ready—the magic is in the timing and flow of the steps, especially when you 1) put the eggs in a bowl, mix, then add sugar. This ensures your sponge gets the perfect fluttery structure.
Step 2: Whisk Egg Yolks and Sugar
Start by placing the egg yolks in a bowl and add two-thirds of your sugar. Beat them vigorously until the mixture thickens and turns pale yellow. It’s mesmerizing to watch the batter turn silky and form ribbons — that means you’re on the right track to a heavenly cake.
Step 3: Make the Meringue
In a separate clean bowl, beat the egg whites until they start foaming and double in size. Gradually add the remaining sugar in two or three batches, continuing to beat until stiff peaks form. The step 1) put the eggs in a bowl, mix, then add sugar is crucial here since it sets the stage for the meringue’s stability, which in turn creates that signature airiness.
Step 4: Fold Batter and Flour
Sift the flour carefully and fold it gently into the yolk mixture. Then incorporate one-third of the meringue with a whisk to smooth it out. Continue folding in the remaining meringue using a spatula to preserve as much air as possible.
Step 5: Add Melted Butter
Pour the melted butter into the batter and fold it in lightly. Don’t worry if the butter isn’t fully incorporated—a few swirls of butter promise a tender crumb without sacrificing fluffiness. Remember, this process is part of mastering the way to 1) put the eggs in a bowl, mix, then add sugar to keep that fluffy charm.
Step 6: Bake and Cool
Pour your batter into the prepared cake pan. Tap it gently on the bench to release any hidden air bubbles. Bake for about 25 minutes or until a skewer inserted in the center comes out clean. Once out of the oven, drop the pan a couple of times to loosen the cake, then invert it onto a rack to cool completely. This cooling technique keeps the sponge from shrinking, preserving the perfect texture shaped by your careful mixing.
How to Serve 1) Put the eggs in a bowl, mix, then add sugar
Garnishes
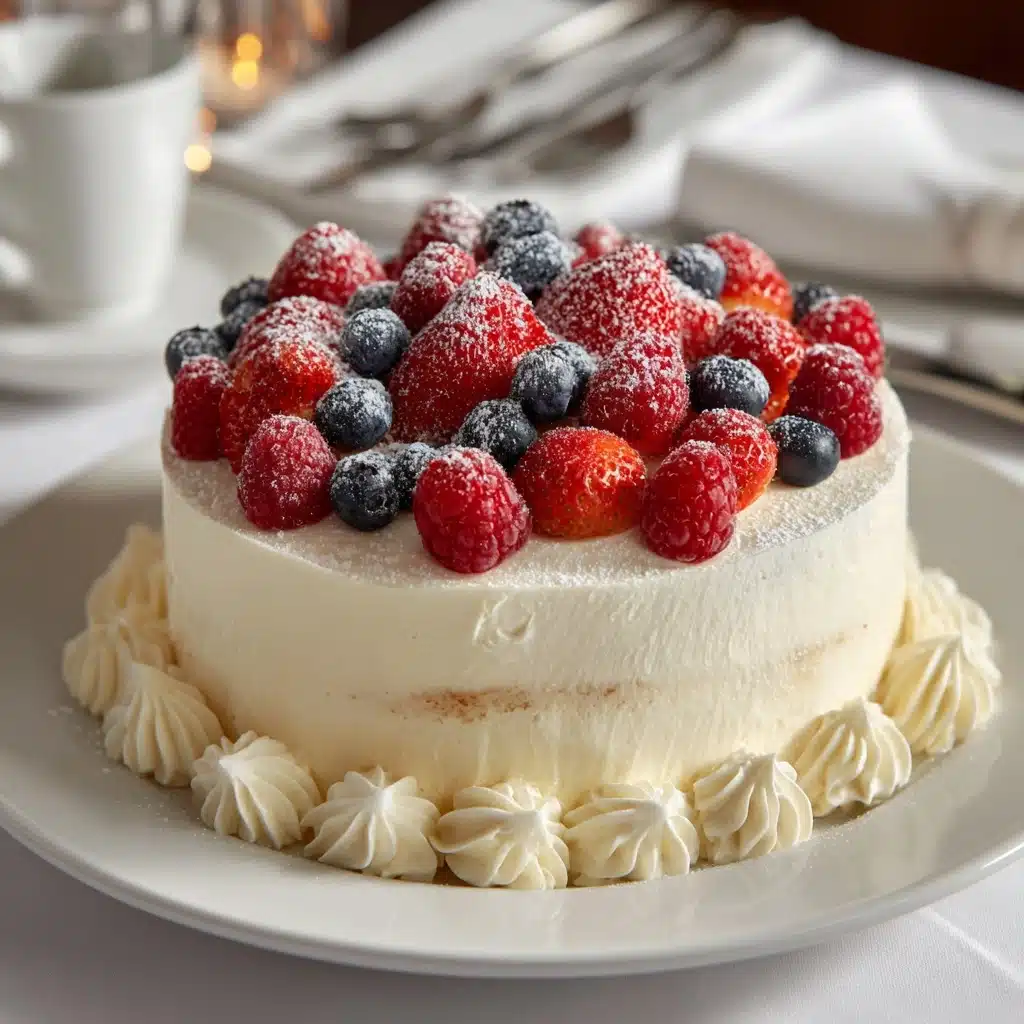
Show off your cake with fresh strawberries perched on the peaks of piped whipped cream. This icing technique highlights the joyful texture achieved when you 1) put the eggs in a bowl, mix, then add sugar right from the start of your baking journey. A few strategically placed berries not only brighten the plate but invite anticipation with every bite.
Side Dishes
This strawberry sponge cake pairs beautifully with simple accompaniments like a chilled green tea or a delicate bowl of seasonal fruit salad. Light, refreshing, and not too sweet, these sides keep the spotlight on your meticulously crafted cake. A scoop of vanilla ice cream also works wonders, melting slightly into the sponge for a luxurious contrast.
Creative Ways to Present
Creating individual mini versions of this cake in jars or small glasses adds a charming, personalized flair. Layer sponge pieces with whipped cream and sliced strawberries for a parfait style that captures the spirit of 1) put the eggs in a bowl, mix, then add sugar in every bite. For a party, try decorating the top with edible flowers or a dusting of powdered sugar for an elegant finish.
Make Ahead and Storage
Storing Leftovers
Keep your cake refrigerated in an airtight container to maintain its freshness and prevent the whipped cream from absorbing other fridge odors. It’s best enjoyed within two days, as the strawberries begin to soften and the cream may lose its charm after that window.
Freezing
While this cake is delicate, you can freeze the sponge layer alone wrapped tightly in plastic wrap and foil. However, freezing the fully assembled cake is not recommended since the whipped cream and strawberries don’t thaw well, often becoming watery or losing their texture.
Reheating
If your sponge cake feels slightly stiff after refrigeration, let it come to room temperature for about 30 minutes before serving. Avoid microwaving to protect the delicate texture and the crisp freshness of the strawberries topping, the very fruit that brings this cake to life.
FAQs
Why is the step 1) Put the eggs in a bowl, mix, then add sugar so important?
This step ensures the eggs are beaten properly, allowing sugar to dissolve evenly and air to be incorporated for volume and lightness. It lays the foundation for the sponge’s signature fluffy texture.
Can I use frozen strawberries for this cake?
Fresh strawberries are best for maintaining structure and flavor. Frozen berries tend to release water when thawed, which can make the cake soggy.
What if I don’t have a sifter for flour?
While sifting helps lighten the flour and remove lumps, you can use a fine-mesh sieve or whisk the flour vigorously to aerate it before folding into the batter.
Is it possible to make this cake without separating the eggs?
You can try the alternative method mentioned in the recipe notes, which involves beating whole eggs over a water bath, but the classic separated egg method is preferred for the best light sponge.
How do I know when the meringue is ready?
The meringue is ready when it forms firm peaks that hold their shape when you lift the whisk. This stability is key for a successful fold that maintains the airy texture of the cake.
Final Thoughts
Tackling the Japanese Strawberry Sponge Cake might seem intimidating at first, but once you remember to 1) put the eggs in a bowl, mix, then add sugar, you’re halfway there to baking magic. It’s a true crowd-pleaser that balances lightness with luscious fruitiness, perfect for celebrations or any day you want to treat yourself. I wholeheartedly encourage you to give this recipe a go—it’s a delicious way to bring a little bit of Japan’s sweetness into your kitchen and heart.